Found this article extremely useful: https://www.fortwayneprinterrepair.com/wordpress/2014/03/17/xerox-phaser-6500-workcentre-6505-light-print-issues/
copy of article below incase the link ever breaks.
Troubleshooting Light Print Issues on the Xerox Phaser 6500 / WorkCentre 6505
I haven’t worked on a whole lot of these machines but one problem that I’ve ran into on more than one occasion is light print issues. Before I get started I want to explain that this article is for light print issues associated with a single color. If you have light print issues with the whole page you might want to move on because this article might not contain the answers your looking for.
First, I get a call to check a machine out that has light print. Upon arrival the customer informs me that over the last few days the print kept getting lighter and lighter. Finally, they replaced the cartridge but unfortunately that didn’t solve the problem. Most times I see this in black as that is the most used cartridge but it could happen in any color. Obviously lots of things can cause this problem but more often than not I’ve been finding it to be an issue with third party cartridges. I’m unsure exactly what happens but it would seem the cartridge runs out of toner before the chip tells the machine it is. Therefore the auger system empties out and the developer unit inside the Drum unit does the same thing. The only way to fix the problem is to put the machine into Diagnostic Mode and pump more toner into the auger and developer.
Troubleshooting Tips
1. Probably the easiest way to see if you have a toner issue is to remove the effected toner and one of the other colors.
2. Remove the Drum Unit – You must remove the cassette tray to open the front cover enough to remove. Careful not to damage or scratch the black transfer belt assembly as this will effect image quality.
3. On the right side, inside the print mech, is the end of the four augers that feed toner into the developer. Typically this area is usually dirty.
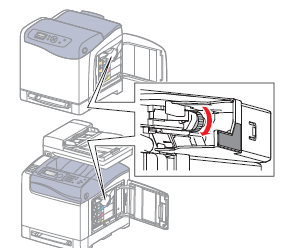
4. In the picture below you will see the toner motor gear, move the gear in the direction shown a few times. If there is no toner is the auger system the very little or no toner will come out the end in the front of the machine. Now do the same test from the good color cart that you previously removed. you should notice the difference in the amount of spillage between the two.
Note : For step 5 make sure the toner cartridge you are using is new. Recommend Xerox OEM.
5. If you do find that the auger is empty you will need to put the machine into diagnostic mode and run the toner motor for that selected cartridge. The service manual says to run the test with the cartridge out but in this case we will want to leave the cartridge in. Turn on the motor test for about 30 seconds. Then print off 10 to 20 pages. It might take a few pages to get the color fully restored. Now if that doesn’t work then you could try another 30 seconds. If that still doesn’t work then I would start looking some where else or take the cartridge out, cheat the side interlock switch and verify the motor gear is rotating.
Entering Service Diagnostics
1. Turn the printer Off.
2. Press and hold the Up and Down arrows simultaneously and turn the printer On.
3. Release the buttons when Service Mode and ESS Diag appear on the SFP display, or Service Mode, Printer, and Fax/Scanner appear on the MFP display.
4. Run the Toner Motor test: Engine Diag > Motor Test > (C)(M)(Y)(K) Toner Motor.
Exiting Service Diagnostics
Scroll to Exit Mode, select Complete, then press OK.
Conclusion on the Light Print Issues
Obviously, this article only touches on specific problem with the light print issues. However, I’ve seen this enough to know it’s a real problem with these Xerox and Dell models. I hope this will help others find solutions to there problems. Not every problem is the same and this might not be the fix for your particular issue. If anything it might help you rule out several parts of the machine.
